Lazy Urban Farming Raised Beds
A couple friends and neighbors have asked what plans I followed to build our raised vegetable beds, and honestly, I didn’t. These were thumbnail designs in my head based on three principles:
- Minimize the number of cuts needed (all done at store)
- Waste as little material as possible
- Materials have to fit in my car (Subaru Forester)
All that said, these are a bit over-engineered and you might save some money and effort going with lighter/smaller options, but I’ll leave that call up to you. I wanted a fairly high bed for ease of work and to reduce how far I needed to dig down into the existing soil (I wanted to amend the existing soil with compost/manure so I could grow darn near anything; even things with deep roots.)
Examining lumber at my local Home Depot, I found the best value for my vision appeared to be 16′ long, 2″ thick, 8″ wide. Two planks stacked would give me 16″ height, and I planned to dig down about 20″ for a total bed depth of 36″ (remember what I said about overkill?).
At 16′ long, I decide that 8′ x 4′ would be the overall dimensions of the bed. This would meet principles 1-3 and also not be so wide that we could reach the middle of the bed without too much leaning/stretching.
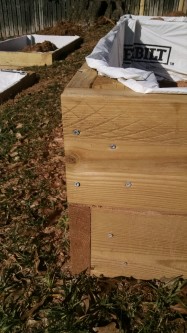
Two courses of 8′ x 4′ boards are screwed together with self-driving deck screws (#8 x 2-1/2 in. T-Star Drive Flat-Head) with an electric drill, with alternating edges.
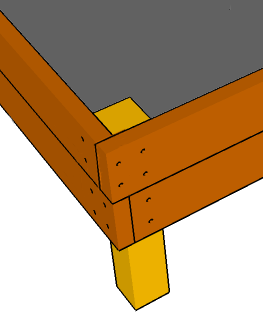
Each corner is reinforced with a 2′ long 4″ x 4″ post (cut from the standard 8′ size at the hardware store). This means the posts intentionally extend BENEATH the bottom of the bed a bit. This helps the bed stay put once they are set into the ground.
These are heavy, so build on site or be strong and/or bring a strong friend to move them.
I then set them precisely where I wanted, double checked spacing (I wanted enough space between them to move comfortable and transport basic tools). I then marked their outline with landscaping paint.
Moving the beds aside temporarily, I cut out the sod (saving it to patch rough spots elsewhere in yard) and excavated post holes for the corners and a bit more to loosing the existing soil for later amendment. Basically, I wanted the bottom lip of the bed to rest on the ground. This can be tricky on slopes, so I strongly recommend level ground unless you have no other option.
Finally, stapled Tyvek sheet on the inside of the bed to deter rot and soil seeping between any less than perfect board fittings.
A small piece of 1″ x 2″ trim can be added around to the top edge to improve appearance and further secure the Tyvek liner. Painting is optional, but I would only paint the outside with farm-friendly paint though.
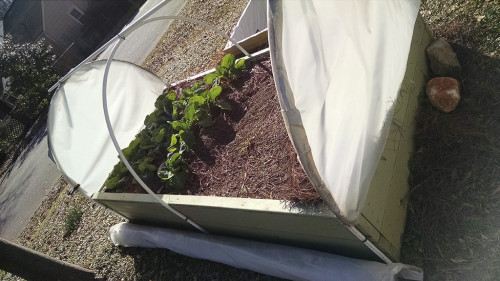
Finally, as winter approached I improvised some cold-frame / tunnels out of plastic sheeting. Using copper pipe hangers screwed into the outside of the raised beds, allows me to hoop light gauge PVC pipe over the beds, over which plastic sheeting can be clamped. I added a cross pieces to extra stability, and a wooden pole at the ends of the sheet to make it easy to roll the frames up and down as needed.
Questions? Suggestions? Let me know. This is my first large raised bed projects, so plenty of room for improvement and I’m sure my instructions are rudimentary. Good luck and share your results if you decide to give raised bed gardening a try.